

Like our free content? Then you'll love our exclusive Club!
Divi Academy Membership gives you exclusive access to over 110 resources, including child themes, layouts, cheatsheets, tutorials, live training and member perks. And new content is added EVERY Monday!
Recipe #11 is by popular demand and something I really enjoyed creating. Four more linkable image hover effects!
Last time I showed you how to use the CSS attr() Function to display our content, this time I am going to use the ‘figure’ and ‘figcaption’ elements to achieve similar results. There is always more than one way to skin a cat ;).
Hover over the image below or click here to see the live demo of all four effects and download the json file (you need Divi 2.7 for this as it uses the new portability functionality).
PUG PUPPIES

Pug Puppies
So let’s get cooking!
Ingredients
The Divi Theme or Divi Builder Plugin from Elegant Themes
A suitable image (any size will do but mine are 480 x 320px)
Cooking time
This should take you around 10 minutes max.
Preparation
The first thing we need to do is create our module. In this tutorial I will show you how to achieve the first effect (slide down) but the process is the same for all of them.
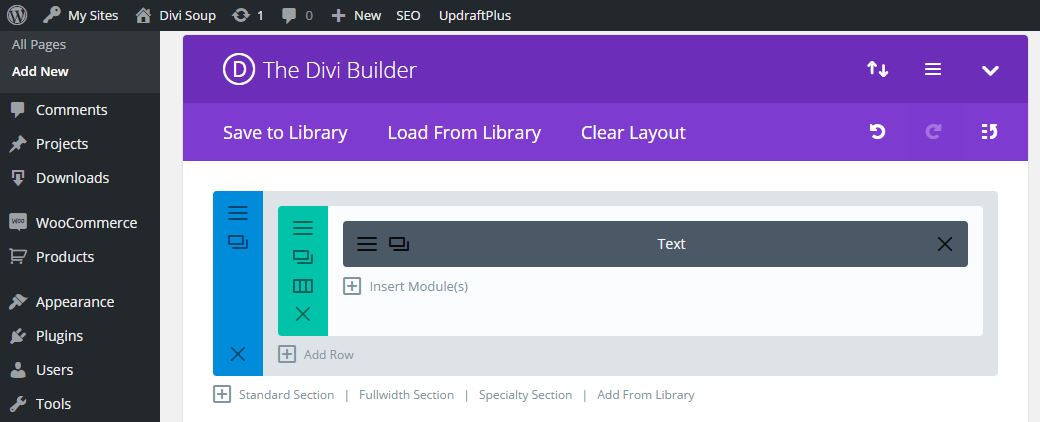
Create a new section with one column and add a text module.
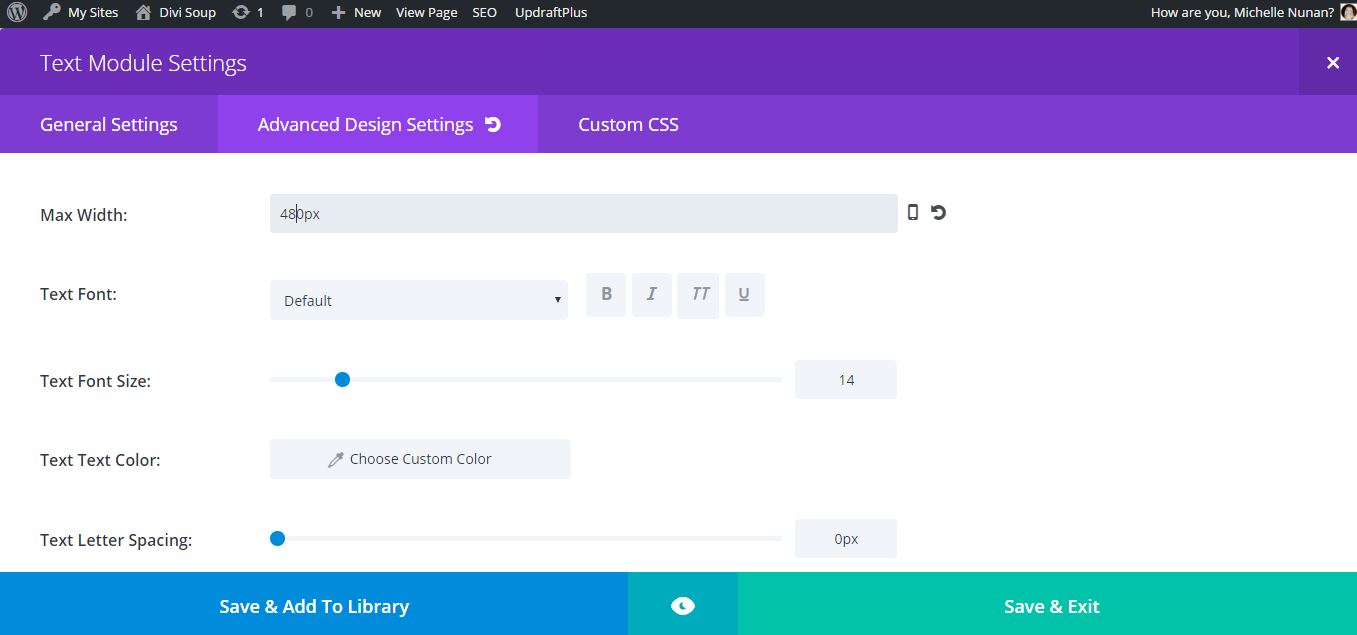
As we are just using one column, we are going to open up the advanced design settings tab and set the max width to the width of the images we are using, so mine is 480px but you use whatever image size you choose. This will just stop the titles from overhanging the image if the image width is less than the width of the module. If you are using more than one column then you may not need to set the max width but do check on larger screen sizes and use it if you need to.
Method
Next, open up your text module, scroll down to the content area and paste in the following, then save and exit:
You will need to add your title, image url, hover title, link url and link text depending on what you want to show.
<div class="ds-hover5-wrapper"><div class="ds-hover5">
<h2>TITLE HERE</h2>
<p> </p>
<figure class="ds-hover5"><img src="IMAGE URL HERE"><br><figcaption>
<p>HOVER TITLE HERE</p>
<p><a href="LINK URL HERE">LINK TEXT HERE</a></p>
</figcaption>
</figure>
</div>
</div>
Here is the code for each effect
Slide Down HTML
<div class="ds-hover5-wrapper"><div class="ds-hover5">
<h2>TITLE HERE</h2>
<p> </p>
<figure class="ds-hover5"><img src="IMAGE URL HERE"><br><figcaption>
<p>HOVER TITLE HERE</p>
<p><a href="LINK URL HERE">LINK TEXT HERE</a></p>
</figcaption>
</figure>
</div>
</div>
Shutter Vertical HTML
<div class="ds-hover6-wrapper"><div class="ds-hover6"> <h2>TITLE HERE</h2> <p> </p> <figure class="ds-hover6"><img src="IMAGE URL HERE"><br><figcaption> <p>HOVER TITLE HERE</p> <p><a href="LINK URL HERE">LINK TEXT HERE</a></p> </figcaption> </figure> </div> </div>
Shutter Horizontal HTML
<div class="ds-hover7-wrapper"> <div class="ds-hover7"> <h2>TITLE HERE</h2> <p> </p> <figure class="ds-hover7"><img src="IMAGE URL HERE"><br><figcaption> <p>HOVER TITLE HERE</p> <p><a href="LINK URL HERE">LINK TEXT HERE</a></p> </figcaption> </figure> </div> </div>
Push Up HTML
<div class="ds-hover8-wrapper"> <div class="ds-hover8"> <h2>TITLE HERE</h2> <p> </p> <figure class="ds-hover8"><img src="IMAGE URL HERE"><br><figcaption> <p>HOVER TITLE HERE</p> <p><a href="LINK URL HERE">LINK TEXT HERE</a></p> </figcaption> </figure> </div> </div>
Now for the CSS, copy and paste the code below into your Child Theme style.css or if you aren’t using a child theme (which you really should be) then paste into the Divi Theme Options epanel custom CSS section and don’t forget to save.
/*----- Effect 5 - Slide Down -----*/

.ds-hover5-wrapper {
	position: relative;
	color: rgba(0,0,0,0);
	width: 100%
}

.ds-hover5 h2 {
   position: absolute;
   z-index: 1;
   top: 20px;
   left: 20px;
   font-size: 30px;
   color: #fff;
   background-color: #000;
   padding: 5px;
   -webkit-opacity: 0.75;
   -moz-opacity: 0.75;
   opacity: 0.75;
}

.ds-hover5 p {
	color: #000;
}

.ds-hover5-wrapper:hover .ds-hover5 h2 {
   -webkit-opacity: 0;
   -moz-opacity: 0;
   opacity: 0;
   -webkit-transition: all 0.5s ease;
   -moz-transition: all 0.5s ease;
   transition: all 0.5s ease;
}

figure.ds-hover5 {
	margin: 0;
	padding: 0;
	display: inline-block;
	line-height: 0;
	position: relative;
	overflow: hidden;
}

figure.ds-hover5 img{
	display: block;
}

figure.ds-hover5 figcaption a{
	text-decoration: none;
}

figure.ds-hover5::before, figure.ds-hover5::after{
	content: '';
	width: 100%;
	height: 100%;
	display: block;
	background: black;
	position: absolute;
	opacity: 0.3;
	top: 0;
	left 0;
	-moz-transform: translate3d(0, -100%, 0);
	-webkit-transform: translate3d(0, -100%, 0);
	transform: translate3d(0, -100%, 0);
	-moz-transition: all 0.5s;
	-webkit-transition: all 0.5s;
	transition: all 0.5s;
}

figure.ds-hover5 figcaption{
	position: absolute;
	display: block;
	line-height: 1.7em;
	-webkit-box-sizing: border-box;
	-moz-box-sizing: border-box;
	box-sizing: border-box;
	text-align: center;
	background: rgba(255, 255, 255, 0.75);
	padding: 10px;
	z-index: 100;
	width: 50%;
	max-height: 100%;
	overflow: hidden;
	top: 50%;
	left: 0;
	-moz-transform: translate3d(-100%, -50%, 0);
	-webkit-transform: translate3d(-100%, -50%, 0);
	transform: translate3d(-100%, -50%, 0);
	opacity: 0;
	-moz-transition: all 0.5s;
	-webkit-transition: all 0.5s;
	transition: all 0.5s;
}

figure.ds-hover5:hover::before{
	-moz-transform: translate3d(0, 0, 0);
	-webkit-transform: translate3d(0, 0, 0);
	transform: translate3d(0, 0, 0);
}

figure.ds-hover5:hover figcaption{
	opacity: 1;
	-moz-transform: translate3d(0, -50%, 0);
	-webkit-transform: translate3d(0, -50%, 0);
	transform: translate3d(0, -50%, 0);
	-moz-transition: all 0.5s;
	-webkit-transition: all 0.5s;
	transition: all 0.5s;
	-moz-transition-delay: 0.5s;
	-webkit-transition-delay: 0.5s;
	transition-delay: 0.5s;
}
Here is the CSS for all four effects
Slide Down CSS
/*----- Effect 5 - Slide Down -----*/

.ds-hover5-wrapper {
	position: relative;
	color: rgba(0,0,0,0);
	width: 100%
}

.ds-hover5 h2 {
   position: absolute;
   z-index: 1;
   top: 20px;
   left: 20px;
   font-size: 30px;
   color: #fff;
   background-color: #000;
   padding: 5px;
   -webkit-opacity: 0.75;
   -moz-opacity: 0.75;
   opacity: 0.75;
}

.ds-hover5 p {
	color: #000;
}

.ds-hover5-wrapper:hover .ds-hover5 h2 {
   -webkit-opacity: 0;
   -moz-opacity: 0;
   opacity: 0;
   -webkit-transition: all 0.5s ease;
   -moz-transition: all 0.5s ease;
   transition: all 0.5s ease;
}

figure.ds-hover5 {
	margin: 0;
	padding: 0;
	display: inline-block;
	line-height: 0;
	position: relative;
	overflow: hidden;
}

figure.ds-hover5 img{
	display: block;
}

figure.ds-hover5 figcaption a{
	text-decoration: none;
}

figure.ds-hover5::before, figure.ds-hover5::after{
	content: '';
	width: 100%;
	height: 100%;
	display: block;
	background: black;
	position: absolute;
	opacity: 0.3;
	top: 0;
	left 0;
	-moz-transform: translate3d(0, -100%, 0);
	-webkit-transform: translate3d(0, -100%, 0);
	transform: translate3d(0, -100%, 0);
	-moz-transition: all 0.5s;
	-webkit-transition: all 0.5s;
	transition: all 0.5s;
}

figure.ds-hover5 figcaption{
	position: absolute;
	display: block;
	line-height: 1.7em;
	-webkit-box-sizing: border-box;
	-moz-box-sizing: border-box;
	box-sizing: border-box;
	text-align: center;
	background: rgba(255, 255, 255, 0.75);
	padding: 10px;
	z-index: 100;
	width: 50%;
	max-height: 100%;
	overflow: hidden;
	top: 50%;
	left: 0;
	-moz-transform: translate3d(-100%, -50%, 0);
	-webkit-transform: translate3d(-100%, -50%, 0);
	transform: translate3d(-100%, -50%, 0);
	opacity: 0;
	-moz-transition: all 0.5s;
	-webkit-transition: all 0.5s;
	transition: all 0.5s;
}

figure.ds-hover5:hover::before{
	-moz-transform: translate3d(0, 0, 0);
	-webkit-transform: translate3d(0, 0, 0);
	transform: translate3d(0, 0, 0);
}

figure.ds-hover5:hover figcaption{
	opacity: 1;
	-moz-transform: translate3d(0, -50%, 0);
	-webkit-transform: translate3d(0, -50%, 0);
	transform: translate3d(0, -50%, 0);
	-moz-transition: all 0.5s;
	-webkit-transition: all 0.5s;
	transition: all 0.5s;
	-moz-transition-delay: 0.5s;
	-webkit-transition-delay: 0.5s;
	transition-delay: 0.5s;
}
Shutter Vertical CSS
/*----- Effect 6 - Shutter Vertical -----*/

.ds-hover6-wrapper {
	position: relative;
	color: rgba(0,0,0,0);
	width: 100%
}

.ds-hover6 h2 {
   position: absolute;
   z-index: 1;
   bottom: 5px;
   left: 0px;
   width: 100%;
   font-size: 30px;
   text-align: center;
   text-transform: uppercase;
   font-size: 25px;
   color: #fff;
   background-color: #000;
   padding: 5px;
   -webkit-opacity: 0.75;
   -moz-opacity: 0.75;
   opacity: 0.75;
}

.ds-hover6 p {
	color: #000;
}

.ds-hover6-wrapper:hover .ds-hover6 h2 {
   -webkit-opacity: 0;
   -moz-opacity: 0;
   opacity: 0;
   -webkit-transition: all 0.5s ease;
   -moz-transition: all 0.5s ease;
   transition: all 0.5s ease;
}

figure.ds-hover6 {
	margin: 0;
	padding: 0;
	display: inline-block;
	line-height: 0;
	position: relative;
	overflow: hidden;
}

figure.ds-hover6 img{
	display: block;
}

figure.ds-hover6 figcaption a{
	text-decoration: none;
}

figure.ds-hover6::before, figure.ds-hover6::after{
	content: '';
	width: 100%;
	height: 100%;
	display: block;
	background: black;
	position: absolute;
	opacity: 0.3;
	top: 0;
	left 0;
	-moz-transform: translate3d(0, -100%, 0);
	-webkit-transform: translate3d(0, -100%, 0);
	transform: translate3d(0, -100%, 0);
	-moz-transition: all 0.5s;
	-webkit-transition: all 0.5s;
	transition: all 0.5s;
}

figure.ds-hover6 figcaption{
	position: absolute;
	display: block;
	line-height: 1.7em;
	-webkit-box-sizing: border-box;
	-moz-box-sizing: border-box;
	box-sizing: border-box;
	text-align: center;
	background: #fff;
	padding: 10px;
	z-index: 100;
	width: 100%;
	max-height: 100%;
	overflow: hidden;
	top: 50%;
	left: 0;
	-moz-transform: translate3d(-100%, -50%, 0);
	-webkit-transform: translate3d(-100%, -50%, 0);
	transform: translate3d(-100%, -50%, 0);
	opacity: 0;
	-moz-transition: all 0.5s;
	-webkit-transition: all 0.5s;
	transition: all 0.5s;
}

figure.ds-hover6::after{
	-moz-transform: translate3d(0, 100%, 0);
	-webkit-transform: translate3d(0, 100%, 0);
	transform: translate3d(0, 100%, 0);
}

figure.ds-hover6:hover::before{
	-moz-transform: translate3d(0, -50%, 0);
	-webkit-transform: translate3d(0, -50%, 0);
	transform: translate3d(0, -50%, 0);
}

figure.ds-hover6:hover::after{
	-moz-transform: translate3d(0, 50%, 0);
	-webkit-transform: translate3d(0, 50%, 0);
	transform: translate3d(0, 50%, 0);
}

figure.ds-hover6:hover figcaption{
	opacity: 1;
	-moz-transform: translate3d(0, -50%, 0);
	-webkit-transform: translate3d(0, -50%, 0);
	transform: translate3d(0, -50%, 0);
	-moz-transition: all 0.5s;
	-webkit-transition: all 0.5s;
	transition: all 0.5s;
	-moz-transition-delay: 0.5s;
	-webkit-transition-delay: 0.5s;
	transition-delay: 0.5s;
}
Shutter Horizontal CSS
/*----- Effect 7 - Shutter Horizontal -----*/

.ds-hover7-wrapper {
	position: relative;
	color: rgba(0,0,0,0);
	width: 100%
}

.ds-hover7 h2 {
   position: absolute;
   z-index: 1;
   top: 0px;
   left: 0px;
   width: 100%;
   font-size: 30px;
   text-align: center;
   text-transform: uppercase;
   font-size: 25px;
   color: #fff;
   background-color: #000;
   padding: 5px;
   -webkit-opacity: 0.75;
   -moz-opacity: 0.75;
   opacity: 0.75;
}

.ds-hover7 p {
	color: #fff;
	font-size: 20px;
}

.ds-hover7-wrapper:hover .ds-hover7 h2 {
   -webkit-opacity: 0;
   -moz-opacity: 0;
   opacity: 0;
   -webkit-transition: all 0.5s ease;
   -moz-transition: all 0.5s ease;
   transition: all 0.5s ease;
}

figure.ds-hover7 {
	margin: 0;
	padding: 0;
	display: inline-block;
	line-height: 0;
	position: relative;
	overflow: hidden;
}

figure.ds-hover7 img{
	display: block;
}

figure.ds-hover7 figcaption a{
	text-decoration: none;
	font-size: 15px;
	border: 1px solid #ff6600;
	padding: 5px 10px;
}

figure.ds-hover7::before, figure.ds-hover7::after{
	content: '';
	width: 100%;
	height: 100%;
	display: block;
	background: black;
	position: absolute;
	opacity: 0.3;
	top: 0;
	left 0;
	-moz-transform: translate3d(0, -100%, 0);
	-webkit-transform: translate3d(0, -100%, 0);
	transform: translate3d(0, -100%, 0);
	-moz-transition: all 0.5s;
	-webkit-transition: all 0.5s;
	transition: all 0.5s;
}

figure.ds-hover7 figcaption{
	position: absolute;
	display: block;
	line-height: 1.7em;
	-webkit-box-sizing: border-box;
	-moz-box-sizing: border-box;
	box-sizing: border-box;
	text-align: center;
	background: rgba(0, 0, 0, 0.7);
	padding: 10px;
	z-index: 100;
	width: 100%;
	max-height: 100%;
	overflow: hidden;
	top: 80%;
	left: 0;
	-moz-transform: translate3d(-100%, -50%, 0);
	-webkit-transform: translate3d(-100%, -50%, 0);
	transform: translate3d(-100%, -50%, 0);
	opacity: 0;
	-moz-transition: all 0.5s;
	-webkit-transition: all 0.5s;
	transition: all 0.5s;
}

figure.ds-hover7::before{
	-moz-transform: translate3d(-100%, 0, 0);
	-webkit-transform: translate3d(-100%, 0, 0);
	transform: translate3d(-100%, 0, 0);
}

figure.ds-hover7::after{
	-moz-transform: translate3d(100%, 0, 0);
	-webkit-transform: translate3d(100%, 0, 0);
	transform: translate3d(100%, 0, 0);
}

figure.ds-hover7:hover::before{
	-moz-transform: translate3d(-50%, 0, 0);
	-webkit-transform: translate3d(-50%, 0, 0);
	transform: translate3d(-50%, 0, 0);
}

figure.ds-hover7:hover::after{
	-moz-transform: translate3d(50%, 0, 0);
	-webkit-transform: translate3d(50%, 0, 0);
	transform: translate3d(50%, 0, 0);
}

figure.ds-hover7:hover figcaption{
	opacity: 1;
	-moz-transform: translate3d(0, -50%, 0);
	-webkit-transform: translate3d(0, -50%, 0);
	transform: translate3d(0, -50%, 0);
	-moz-transition: all 0.5s;
	-webkit-transition: all 0.5s;
	transition: all 0.5s;
	-moz-transition-delay: 0.5s;
	-webkit-transition-delay: 0.5s;
	transition-delay: 0.5s;
}
Push Up CSS
/*----- Effect 8 - Push Up -----*/

.ds-hover8-wrapper {
	position: relative;
	color: rgba(0,0,0,0);
	width: 100%
}

.ds-hover8 h2 {
   position: absolute;
   display: block;
   z-index: 1;
   top: 75%;
   width: 100%;
   font-size: 30px;
   text-align: center;
   text-transform: uppercase;
   font-size: 25px;
   color: #fff;
   background-color: #000;
   padding: 5px;
   -webkit-opacity: 0.75;
   -moz-opacity: 0.75;
   opacity: 0.75;
}

.ds-hover8 p {
	color: #fff;
}

.ds-hover8-wrapper:hover .ds-hover8 h2 {
   -webkit-opacity: 0;
   -moz-opacity: 0;
   opacity: 0;
   -webkit-transition: all 0.5s ease;
   -moz-transition: all 0.5s ease;
   transition: all 0.5s ease;
}

figure.ds-hover8 {
	margin: 0;
	padding: 0;
	display: inline-block;
	line-height: 0;
	position: relative;
	overflow: hidden;
}

figure.ds-hover8 img{
	display: block;
}

figure.ds-hover8 figcaption a{
	text-decoration: none;
}

figure.ds-hover8::before, figure.ds-hover8::after{
	content: '';
	width: 100%;
	height: 100%;
	display: block;
	background: black;
	position: absolute;
	opacity: 0.3;
	top: 0;
	left 0;
	-moz-transform: translate3d(0, -100%, 0);
	-webkit-transform: translate3d(0, -100%, 0);
	transform: translate3d(0, -100%, 0);
	-moz-transition: all 0.5s;
	-webkit-transition: all 0.5s;
	transition: all 0.5s;
}

figure.ds-hover8 figcaption{
	position: absolute;
	display: block;
	line-height: 1.7em;
	-webkit-box-sizing: border-box;
	-moz-box-sizing: border-box;
	box-sizing: border-box;
	text-align: center;
	background: #fff;
	padding: 10px;
	z-index: 100;
	width: 100%;
	max-height: 100%;
	overflow: hidden;
	top: 50%;
	left: 0;
	-moz-transform: translate3d(-100%, -50%, 0);
	-webkit-transform: translate3d(-100%, -50%, 0);
	transform: translate3d(-100%, -50%, 0);
	opacity: 0;
	-moz-transition: all 0.5s;
	-webkit-transition: all 0.5s;
	transition: all 0.5s;
}

figure.ds-hover8 img{
	-moz-transform: translate3d(0, 0, 0);
	-webkit-transform: translate3d(0, 0, 0);
	transform: translate3d(0, 0, 0);
	-moz-transition: all 0.5s;
	-webkit-transition: all 0.5s;
	transition: all 0.5s;
}

figure.ds-hover8 figcaption{
	top: 100%;
	opacity: 1;
	-moz-transform: translate3d(0, 0, 0);
	-webkit-transform: translate3d(0, 0, 0);
	transform: translate3d(0, 0, 0);
}

figure.ds-hover8:hover img{
	-moz-transform: translate3d(0, -30px, 0);
	-webkit-transform: translate3d(0, -30px, 0);
	transform: translate3d(0, -30px, 0);
}

figure.ds-hover8:hover figcaption{
	background-color: #000;
	color: #fff;
	-moz-transform: translate3d(0, -100%, 0);
	-webkit-transform: translate3d(0, -100%, 0);
	transform: translate3d(0, -100%, 0);
	-moz-transition: all 0.5s;
	-webkit-transition: all 0.5s;
	transition: all 0.5s;
}
And that’s it. Now you have some more lovely hover effects to use in your Divi projects.
Don’t forget to check out Recipe #7 for the first four effects.
If you found this helpful please leave a comment and subscribe to my newsletter for all my latest Divi related content. 
Michelle X





Hi there, i want to achieve effect number 1 for a site of a new client. I am following the tutorial and I downloaded the json file but I don’t get where in Divi I have to upload it. I am a noobie at this so maybe I forgot something important.
I tried to upload it using Divi Library but that doesn’t work, because I get the text that it is not possible to upload that file. Could you give me some advice?
With regards, Ellen
I know you probably got this sorted already as its been a while but there is an instructions file included in the download on how to import. Or you can check here for import instructions https://support.divisoup.com/support/solutions/articles/29000005030-exporting-importing-individual-pages
Noobie question here. I downloaded the json file and I thought I had to upload it to the Divi Library but when I do that I get a notification that it isn’t allowed. Where do I upload this file?
Thanks in advance.
Into a page directly https://support.divisoup.com/support/solutions/articles/29000005030-exporting-importing-individual-pages
Hi Michelle, I have just discovered Divi Soup and I am very impressed! Just a quicky about this recipe; in the new version of Divi i cannot find the ‘Max-Width’ option shown in the recipe in the design options for the text module. There is only a ‘Width’ slide bar. Will this recipe still work with the new version of Divi? Thanks!
Yes, that’s the newer setting. We’ll update the recipe, but that’s what you will now use for max-width.
Thank you, Michelle, for the great tutorial.
I have a question.
How to make the clickable link open in the new window?
Right now it opens on top of the page.
Thank you,
Regards,
Alex
Add a target to the html:
LINK TEXT HERE
Hi Michelle, first of all thanks for this great tutorial – really easy to follow and great effects. I have made a few of my own amendments to #7 and am pleased with it but decided I wanted to add a drop shadow. I have added it to the custom css of the code module but I have a white space at the bottom of the image (which isn’t there when I remove the shadow). Am I putting the css in the wrong place? Should I perhaps be adding it within the #7 css somewhere? If so, could you please… Read more »
You need to add the shadow inside the CSS on this element:
figure.ds-hover7
Hi Michelle – could you provide a bit more details on where/how to “add the shadow inside the CSS on this element” ? I’ve got the same white lines at the bottom of the photos when I add the drop shadow. I have been hunting for a long time, trying to figure out where to add it, and what, exactly, to add.
It would be:
figure.ds-hover7 {
box-shadow: your box shadow css here;
}
Hello Michelle,
Just want to know if you have CSS code for this type of effects on the website?
https://onedaybuilds.com/portfolio/
No I don’t, but this plugin will do what you need and much more https://elegantmarketplace.com/downloads/anything-slider/
Lucked onto your site! I attempted to ‘cook’ using #7 hover technique, but could not get it to work. However, #5 functions correctly. Questions: How to place a border around the photos; how to provide shadow effect to give the illusion that photos ‘jump out’; and how to change background color and type setting in the #5 the left slide-in? Thanks!
I would suggest you check out this resource and look up border, box-shadow and background properties https://www.w3schools.com
Hi Michelle,
It’s a cool effect, bravo !
If i put a title h2 + a text of several words, when i’m hover them : there’s no hover-effect > i have the cursor instead
Have you a tips for that ?
Laurent
Laurent you need to work within the tags in the HTML, you can use CSS to style those to look like H2 etc.
Hi is there a way to get it to link to lightbox I want the effect but open image in lightbox.
Thanks
Yes its possible but you will want either a plugin or JS, if you Google something like ‘modal on click’ you should find what you are looking for
Love this effect Michelle, really captivating.
However I have used it for a 4 module section, when the window is increased in size the blocks lock left and have huge gaps in between. Is there any way to centre this section?
Would help if I added a web link!
Ben if you give the modules a class and the apply this styling to that class they should sit centrally:
margin: auto !important;
width: 100%;
Hi Michelle I downloaded and installed Four More Linkable Image Hover Effects and it worked perfectly first time – marvellous job! I have a question – is it possible to have two links in the text? I had it working once by removing the link tag from the top of the text and adding links around the words that wanted to make clickable. I dealt with the styling by using blank anchors and it all worked fine. Unfortunately Divi didn’t like it and stripped out all my changes so I need a workaround! The site is staging at http://www.artisan11.co.uk/ –… Read more »
Sorry, it’s Malcolm, not Malcolem, I can’t spell my own name!
Yes Malcolm, you can just add in another link but it will need to be between the tags
Excellent tutorial and just the effect I am looking to create for a gallery of images.
With PUSH UP effect, I don’t want to see the initial black title overlay, just the mouse-over effect. I eliminated the text but the black horizontal line is still showing up. What can I do to make the it go away?
Here’s a draft of the page:
Removing this section of CSS should do it Judi
.ds-hover8 h2 {
position: absolute;
display: block;
z-index: 1;
top: 75%;
width: 100%;
font-size: 30px;
text-align: center;
text-transform: uppercase;
font-size: 25px;
color: #fff;
background-color: #000;
padding: 5px;
-webkit-opacity: 0.75;
-moz-opacity: 0.75;
opacity: 0.75;
}
The black horizontal bar is still showing even after removing the CSS You can see here: I just love the effect but not the thin black bar. Any other suggestions to remove? Here’s the code: /*—–Four More Linkable Image Hover Effects—–*/ /*—– Effect 8 – Push Up —–*/ .ds-hover8-wrapper { position: relative; color: rgba(0,0,0,0); width: 100% } .ds-hover8 p { color: #fff; } .ds-hover8-wrapper:hover .ds-hover8 h2 { -webkit-opacity: 0; -moz-opacity: 0; opacity: 0; -webkit-transition: all 0.5s ease; -moz-transition: all 0.5s ease; transition: all 0.5s ease; } figure.ds-hover8 { margin: 0; padding: 0; display: inline-block; line-height: 0; position: relative; overflow: hidden;… Read more »
Sorry but I can’t see the link as it is in draft
Hi Michelle,
This is one delicious soup and I like it, but I just wanted to know if we could apply it to image blurbs?
Yes you can apply hovers to the blurb but the CSS would need changing, as it is it would not work
Hi Michelle,
Thanks for the great work you doing teaching the great unwashed some nifty tricks. I used your hover 6 (Shutter Vertical) and it has worked very well for many months. I upgraded (maybe foolishly) to WP 4.6.1 and the hover effect has stopped working. I upgraded Divi to the latest version again to no avail. Interestingly, I have the same issue with a hover developed by Paul Yates! My site is just a social one so there are no dramas but just wanted to give you a heads up before others discover the issue
Thanks Tony, it is probably just somewhere that needs an !important, do you have a link to where you are using the effect?
Hi Michelle,
Sorry for the delay in responding. Just been moving my sites to new hosting. the site is sgc.esag.net.au
Any particular location Tony, I can’t see any attempts to use the effect?
Hi Michelle,
The effect is being used just under the ticker with labels Tiger – Best Score Goose – Worst Score Dummy Spit – Yep.
I am also using a Paul Yates hover which I have disabled from the page and this is also not working since the WP upgrade.
Hi Michelle,
Sorry to be a pain but could you use this url – . I am updating the site and will be reverting back to a previous way of displaying blurbs.
Tony I think WP may have stripped the tags in the html, can you check the text in the content area of the module and see if it looks the same as in the blog post?
Hi Michelle,
Sorry for the delay responding. The text in the content area is as follows:
Tiger- Best Score Tony Barnett – 38 pts
I believe this is as it should be.
Please dont waste too much of your valuable time on this as its not that important
Yes it looks like your tags are being stripped. Check all the comments on this post, a solution lies within
Hi Michelle,
Been using, Effect 6 – Shutter Vertical for some months and its been working really well but this week I have updated my social golf website (www.sgc.esag.net.au) and the hover effect doesn’t work. I did update to wordpress 4.6.1 but am still using Divi 2.7.8. Its no big drama for me as I can find some other hover effect but thought I’d just bring it to your attention.
I can’t see which images on your site are using it Tony, can you let me know?
HI can you help me how to make this responsive ..I used your hover effect here but its not responsive in mobile http://jhencaneta.com/sample/divigrid/
You seem to have used a different layout than the one I have provided which is why it is not responsive, you will probably want to add some media queries to your CSS
Hi How do I move the 2nd image to the left please? I really need to do it http://jhencaneta.com/sample/divigrid/
Hello everybody ! I don’t know if I’m in the right place for my question, so forgive me if i’m not! I would use the Portfolio module design to make a kind of menu where each image points to one of my pages. But the Portfolio Module uses the Projects page, and I would do the same with simple pages. I have several solutions but none is satisfactory: Solution 1: Use the Portfolio Module and find a trick to make links to simple pages instead of project pages. Solution 2: Use the Image Module and find a trick to bring… Read more »
Based on the explanation of what you want to do, I would use this gallery module method https://divisoup.com/how-to-add-links-to-the-divi-gallery-module-and-show-captions-on-hover/
Hi Michelle,
I’m just using this on a website I’m creating for home staging and the effect is amazing.
Thank you so much for the time and effort you’ve put in here.
Welcome Mike thanks for the comment
Hello
It is me again. This time I have a real issue
I implemented the horizontal effect on a divi site using three columns.
It works perfectly except on internet explorer (it works with edge but not on IE9)
On IE9 , display is all scrapped and first two columns are small
website is :
Any idea on how to fix issue with IE9 ?
Problem is also there on IE11 so t seems to be tehre on all IE version before edge
Hi Yves
The page you link to won’t load for me. However, rightly or wrongly I really do not pay much attention to IE, it is a pain and I only have it installed on one of my computers for testing client sites and it often crashes that computer :/
You can look into browser support for any of the CSS you are using here to see if there are prefixes for anything which isn’t working http://www.w3schools.com/cssref/css3_browsersupport.asp
I will have a look byt the way the correct url is :
 sorry for error
wcb-design.be/beauty
Waoooow thanks for this great plugin
I have a quick question. I want to put three pics in one row using 1/3 1/3 1/3 text module
It works fine but is there a way to make the image full width on each column and remove space between columns ?
Thanks a lot
You can forget my previous comment.
It is in fact full-width
I just change glutter of the coumn in it works
Sorry for my previous comment not needed
No problem Yves glad you got it sorted
Quick question/ ask for help – I followed this recipe to add a hover effect to some images on home page and all is good except few spots where “View Gallery” link is broken apart in two lines, please see the screenshot below. I tried to copy paste codes from another one, I tried removing it completely and adding a new one but nothing seems to be doing the trick. To see the issue, please go to URL below and then hover your mouse on “Custom Flooring & Cabinetry” under the Recent Projects section towards the bottom of page. URL:… Read more »
Hey.
Yes I can see the issue, it is because you haven’t removed the title text from within the hover, so if you highlight the text when you hover over the image you can see you have the title text still there, as it is longer than the available space it is pushing the word ‘Gallery’ to a new line. Just remove that text in the HTML as you are not using it and the link should pop back onto one line.
Thank you! That worked!
Can you add the css code using the custom css settings in the module? It asks for CSS ID, CSS Class, Before, Main Element, and After? Also, can you using it in other modules, such as a blurb?
Thanks!
Hi Michael
No you can’t use this code for other modules as it is specific to this effect and because it creates a custom effect adding to the custom css tab will not work either.
Michelle, we have chatted before I sent you a big YOU ARE THE BOMB at least once lol. My client wants hover/css styles on their images however something is off :[ All else is working however would you be willing to review this. The default title band is expanding past the images?
I have my image at 480px and set the text advanced setting to 480px. Copied the code and pasted it correctly as all else works :[ THANKS!!!
Thanks Clayton I remember
I see you got this working fine now?
Great effects, thanks for sharing Michelle.
May I only suggest a small modification? Mouse over the title doesn’t trigger the hover effect – I solved it by putting the h2 title within the ‘figure’ tag. I’m not sure is this valid in html5, but it works
Yes that is correct and the way it is supposed to be Zlatko but if you want the effect on title hover then your solution is fine
Thanks
Not sure why but this effect isn’t working for me. I followed the steps exactly and was able to get as far as seeing the image through the HTML code but am not getting any CSS effect. Is it possible some other code in my child theme is causing some grief and over ruling it somehow? It also mentioned downloading the json file but I don’t see any link to it on this page and the one I did find here: https://divisoup.com/four-more-linkable-image-hover-effects-demo/ gives me the error “The file should not be imported in this context” when attempting to use the… Read more »
Ok well I made some progress. I still couldn’t get the json file to work but I found the XML file and imported that. Oddly the css effect still didn’t work, so I created a new child theme copied all my code back into all the files and it was working. Couldn’t trace why but strangely that did the trick. Now I’m just trying to change the background colors, but unfortunately have had no success. I can make the changes work using the inspector tool in Google Chrome. However when I apply the same color changes to the actual code… Read more »
Hi Michael, with the colour changes, try adding !important, so background: rgba(255,102,0,0.5) !important;
Hi Michael
The CSS should not conflict with anything if you are using the correct classes.
For the JSON file, the link is on the demo page so you have the correct one, Divi content needs to be imported where it was exported from so please use the instructions included within the downloaded zip file to see exactly where to import.
H, I am a novice user. However, when given width on different computers (at different resolutions ) image does not conform to the page and in the mobile version does not fit well on the screen . Do you have any advice?
My problem is in my test website
Sorry Tomek I cannot see on that page where you have implemented this. However if you are using different layouts than the one provided you will need to tweak the CSS to meet your specific needs.
Hi! Thank you so much for these great recipes and tips! I’m wondering if there’s a way to acheive the same effect but over a ciruclar image. Any insights?
Thanks again!
Hi Jon
Not for these particular effects but I will add it to my recipe list
Hi, the HTML code toggles seems to be broken on this page. Please let me know when it is corrected. Great stuff!
Everything looks fine on my end Jeff, can you elaborate please?
See what you mean now Jeff, all fixed and thanks!
Hi Michelle, this is really great but what about the mobile version?
On desktop i have 3 images in one line, on tablet and mobile (ipad & Iphone) among themselves.
On tablet it’s not needed, because there is enough place to show them in one line too.
I checked the css files but i was not able to change it. can you help me?
Thanks!
Katharina
I’m sorry Katharina but I am not clear on what you are asking? Do you want to prevent the images from stacking on tablet? If so then this is automatically activated by Divi, so it will stack items at 980px (from memory) so it is this you will need to adjust but it will adjust for all elements.
Fantastic and amazing… Only a question, Michelle, because of my inexperience: where I have to correct to adjust image dimensions?
Thank’s, Alberto
You should only need to adjust the max width in the advanced settings of the module (and may not even need to do that). Just use whatever size images you want
Michelle, you continue to amaze. The push up is my favorite!
Thank you Terry, a gent as always
Hi, new at Web design…how can I use the xml file you provided ?
This demo uses a json file and there are full usage instructions in the pdf within the zip file you download.
Thanks so much! Appreciate all your recipes!
Welcome Hindy
I love these effects! Thank you, Michelle.
Wow! Michelle. Awesome effect. How do get the ideas ???
I just like to play Manus
Good stuff as always Michelle
Thank you Mr Falcon
Hello Michelle, First of all, I’m on your CSS tips on my main page of the Sticky button is, for example, my constant companion. Thank you for your work and the opportunities that you open to us and also to me so. something is wrong with me. The code does not work when I insert it in the header area in the theme opions. In this case, the CSS code appears in the upper part of said sample Seite.Ich had to outsource it (Duo Leafe add CSS JS in this case). I currently have apparently problems everywhere, if I want… Read more »
Sounds like you are putting thee CSS in the wrong place. Look for the box called Custom CSS