

Like our free content? Then you'll love our exclusive Club!
Divi Academy Membership gives you exclusive access to over 110 resources, including child themes, layouts, cheatsheets, tutorials, live training and member perks. And new content is added EVERY Monday!
The other day I was asked how to make the Bloom optin form transparent. Bloom is notoriously difficult to target but thankfully I had done this just the day before for an optin layout that will be available in my soon to open Divi Membership Club.
Here is a quick snack to get your optins transparent!
So let’s get cooking!
Cooking time
This should take you around 5 minutes max.
Preparation
Let’s set up our optin.
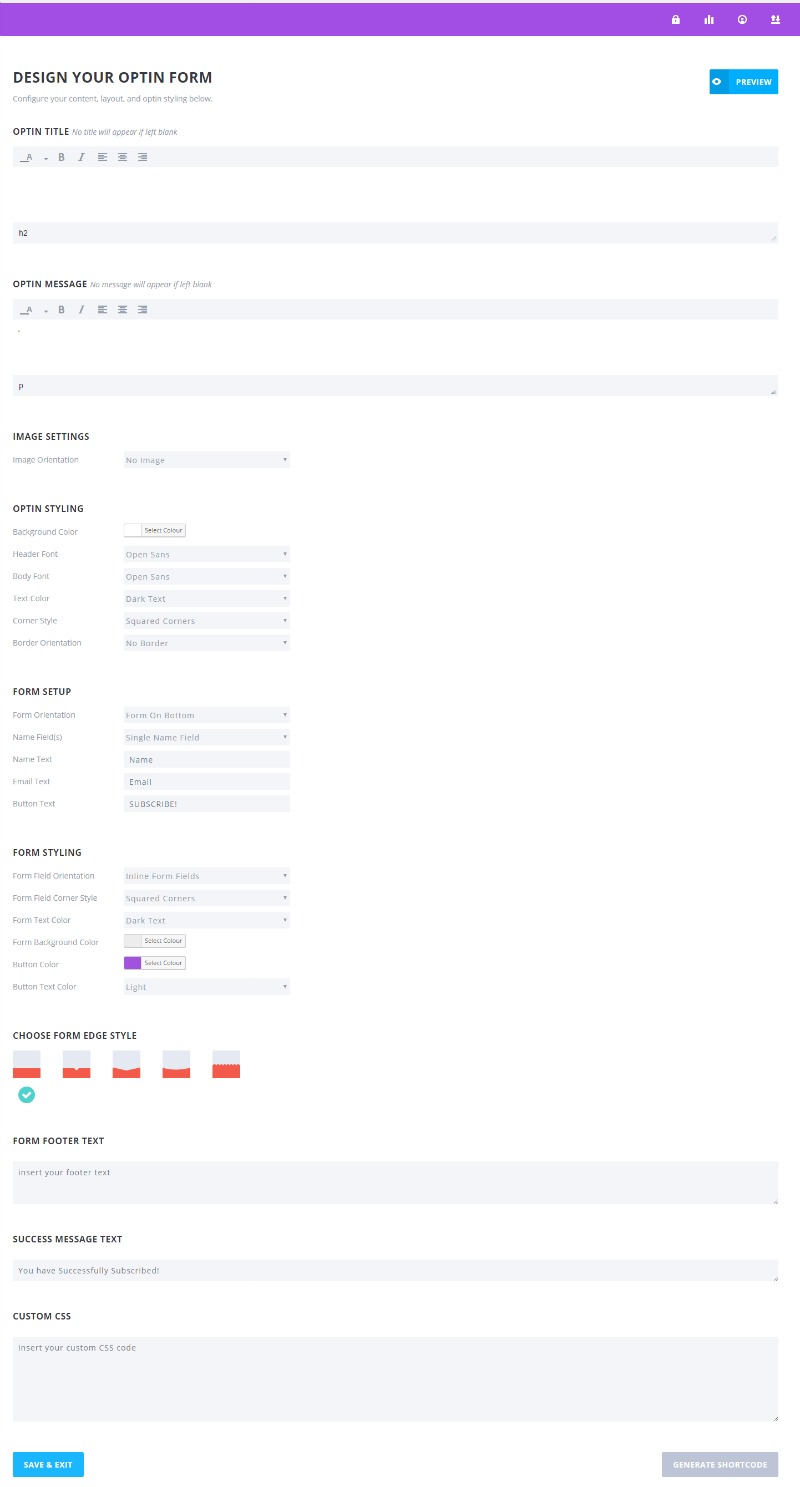
In Bloom, add a new optin and after setting your list, select your layout type. I am using the inline form but this should work with any of the layouts.
I’ve chosen the first design as I want my form fields to be at the bottom.

Remove the title and message text, I always find it’s much easier to add any text you want within your actual module as the styling options are more flexible.
Now you can change any settings you want, but you don’t need to touch the Background Color or Form Background Color fields as these are what we are going to make transparent. You will notice in those fields, unlike the Divi colour pickers, they don’t have the transparency option and you can’t insert an RGBA value  .
.
When you’re finsihed, at the bottom right of the page, grab your form shortcode and then save & exit.
Method
Now let’s add our form. Add a new text module wherever you want your form and paste in the shortcode you grabbed from Bloom.

If you preview your page your form should look something like this (I have added a background image and 30px left and right padding to the module so you can more easily see the difference).
Click on the Custom CSS tab in your text module and give it a CSS ID of ds-transparent-optin then save & exit. We are using an ID rather than a class to make it easier for us to target the form.

Now copy and paste the following CSS into your child theme stylesheet, Divi options custom CSS box or the page specific CSS box. The CSS has comments so you can see what each section is doing.
/*----------------------------------------------*/
/*-----Transparent Bloom Optin by Divi Soup-----*/
/*----------------------------------------------*/


/*Hides the header container*/
#ds-transparent-optin .et_bloom_header_outer {
    display: none;
}


/*Removes form container background colour*/
#ds-transparent-optin .et_bloom_form_container {
    background: none !important;
}


/*Removes form background colour and sets padding*/
#ds-transparent-optin .et_bloom_form_content.et_bloom_bottom_inline {
    padding: 0;
    background: none !important;
}

/*----------------------------------------------*/
/*---End Transparent Bloom Optin by Divi Soup---*/
/*----------------------------------------------*/
Now preview your form and it should look like this (without the background image).
Want your form fields and button transparent too? No problem, just add this additional CSS and adjust borders as required…
/*Set the input field and button transparency and border*/
#ds-transparent-optin input, #ds-transparent-optin button {
    background: none !important;
    border: 1px solid #ffffff !important;
}
Now you should see something like this, you’ll obviously need to set a background image to get the full effect.
Here’s the complete CSS:
Complete CSS
/*----------------------------------------------*/
/*-----Transparent Bloom Optin by Divi Soup-----*/
/*----------------------------------------------*/


/*Hides the header container*/
#ds-transparent-optin .et_bloom_header_outer {
    display: none;
}


/*Removes form container background colour*/
#ds-transparent-optin .et_bloom_form_container {
    background: none !important;
}


/*Removes form background colour and sets padding*/
#ds-transparent-optin .et_bloom_form_content.et_bloom_bottom_inline {
    padding: 0;
    background: none !important;
}


/*Set the input field and button transparency and border*/
#ds-transparent-optin input, #ds-transparent-optin button {
    background: none !important;
    border: 1px solid #ffffff !important;
}

/*----------------------------------------------*/
/*---End Transparent Bloom Optin by Divi Soup---*/
/*----------------------------------------------*/
And that’s it.
If you found this helpful please leave a comment and subscribe to my newsletter for all my latest Divi related content. 
Michelle X





Hi. I used this recipe a while back and it helped tremendously! However today I just updated to the latest version of Divi and now the opt-in button is falling below the fields – so it’s no longer inline. I’ve tried hacking the css to get it to go back to how it was with no luck. Any insights? Thank you much!!
Would need a link to check
Thank you SO much for this! It honestly saved me so much time! I really appreciate it.
Hi Michelle, thanks for the post. It works perfectly!!! But I’m struggle with the Acceptance checkbox. It appears white but I need it to appear with some border or diferent color than white. I hope you can help me. Thanks!!
Can you share a link to your form so I can provide the exact code you’ll need?
My good friend Michelle, I was curious if there’s some way we can use this recipe to change the background color of our Subscribe button? I see you show us how to make the button transparent, and that works without a hitch. I can’t seem to get the button to change colors without going back and modifying the setup in Bloom however. I thought I might be able to get lucky by styling the “button” attribute with “background-color: #COLOR; but that didn’t appear to take. Any hints/tips, or are we stuck doing that in Bloom? I only ask, because it… Read more »
Yes you can Jace, however, the subscribe button is not intuitive to target as it uses both button and span elements.
This is how I approach it:
/*Set the button background to transparent*/
.et_bloom_form_content button {
background: transparent !important;
}
/*Set the link background colour, padding and transition*/
.et_bloom_form_content span {
background: red;
padding: .3em .5em;
transition: all .3s ease;
}
/*Set the hover background colour*/
.et_bloom_form_content span:hover {
background: green;
}
Hi Im using a custom font throughout my site and generally put ‘custom-font’ in the custom css however when I do this for bloom it doesnt work?
You need to make sure you are targeting the correct element of the form, without a link I cannot help much
This code work for Inline Form Field Orientation, but it does not work for Stack Form Field . Please advise how write the code for Stack Form Field. Can we customize the size and width of button?
Do you have a link to your form please and I can take a look for you
I love the idea, but I can’t seem to get it to work. I don’t want to use it site wide, but would prefer to use it on a page by page basis. So I assumed that when you said to paste it into the “page specific CSS box” you meant to click on the main settings button of the Divi builder for the page in question and paste the code into the Custom CSS section on that page. Aside from that option, I am unaware of a “page specific CSS box.” Yet when I put the code there it… Read more »
Yes that is what I meant by page specific. Have you tried switching of static CSS and minification and clearing all your caches?
I had cleared the caches a few times. That had not made any difference. I just now tried turning off the static CSS and didn’t get anywhere with that either.
Jace I see now you have not applied the custom ID used in the CSS to your module so no, the code will not take affect.
This is what you need to add for your particular case.
.et_bloom .et_bloom_form_container .et_bloom_form_header {
display: none;
}
.et_bloom .et_bloom_form_container {
background-color: transparent;
}
For future, the point of adding a custom class or ID is so that style are only applied to the section, row or module that has that class or ID assigned, so if you don’t want the same style on a form somewhere else, just don’t add the class/ID
That’s not actually the case here Michelle. I duplicated your system outlined above in your article. What you see now isn’t my code at all. I have a support request in on the Elegant Themes members support forum, and they are tampering with things.
Yes i see it now, my bad
So add this and you should be good:
#ds-transparent-optin .et_bloom_form_header {
display: none;
}
#ds-transparent-optin .et_bloom_form_content {
background: transparent;
}
Yep, that did it my friend! Thank you very, VERY much!
One last thing Michelle… kind of thinking out loud here…
I don’t need it for this project, but I can see several instances in the future where this would be quite useful. The query is this:
You explain above how to set the input fields to transparent, but what if you wanted to assign the input fields a different background and text color? What would the code be in that instance? Thanks in advance. You rock!
Sorry. I don’t want to spam your comments, but I took it upon myself to see if I could accomplish the thing I asked about this morning. I was able to get it to do what I wanted as shown here: http://baseinstall.nimblesplash.com/traffic-exchange-course/ To anyone who wishes to do the same, here’s my CSS… edit as needed. /*———————————————-*/ /*—–Transparent Bloom Optin by Divi Soup—–*/ /*———————————————-*/ /*Hides the header container*/ #ds-transparent-optin .et_bloom_header_outer { display: none; } /*Removes form container background colour*/ #ds-transparent-optin .et_bloom_form_container { background: none !important; } /*Removes form background colour and sets padding*/ #ds-transparent-optin .et_bloom_form_content.et_bloom_bottom_inline { padding: 0; background: none… Read more »
Glad you got it resolved Jace
As they are messing with that page (and I believe taking me FURTHER AWAY from our goal), here’s a cloned page with a different color text module beneath to distinguish this from the other. This one has your code and class ID if you could be so kind as to peek at it.
http://baseinstall.nimblesplash.com/traffic-exchange-book/
Didn’t really want to stop minifying files, but I just gave that a go as well. The result is still failure.
How would you make the placeholder text for email white instead of gray?
You need to target the the placeholder for the input field. This article should help but you will need to add the classes for the input fields before the double colons https://www.templatemonster.com/help/how-to-change-the-placeholder-text-color-of-an-input.html
Hey Michelle,
Very nice article, it seems like you are an expert with Bloom.
I’m actually having a problem with my Bloom optin forms, for some reason it does not display the x to close.
Can you please help me out?
Thanks in advance!
Do you have a link to an example please?
Not without a link Ronald, it may just be its the same colour as the background
Thank you for this code. As a follow up to my previous query, I have managed to get it working after a few attempts. I haven’t figured out how to change the color of the “Name” and “Email” to white which is what I need against the background image which I have. I have tried to change the text colour to “light” in the bloom settings, and also looked in the divi module settings and can’t figure it out. Any assistance is much appreciated. Thank you.
http://www.xwolf.co.za/wp/test-optin-bloom/
Looks like you worked this out Paul
Hi MIchelle, thank you for the turotial, this is exactly what I need for my website, but I cant seem to get it to work I was hoping you could point me in the right direction. I am fairly new to this so please bear with me. Below, the link:
http://www.xwolf.co.za/wp/test-opt-in-1/
Very useful recipe, thanks a lot, Michelle. Love your cookbook and love to play with the ingredients to make it fit my purpose.
Thanks Joyann
Iv’e been looking for a way to do this for a while now, so this is great. I’ve followed instructions, putting CSS in first the page specific custom css, then tried the child theme custom css but the white background still doesn’t want to go away.. can’t seem to get the field and button to shorten either. link is http://www.cywellness.com/option/ if you want to take a look.
I don’t see the custom ID in your modules Joel, please go back through the instructions again and see where to add the custom ID for the transparency to take effect
THANK YOU! This was *just* what I was looking for! Worked perfectly ;-).
Great news
Hi, I have managed to remove the white upper container, but can’t remove the background color.
It just stays the same. Can you help? Thanks
Can you provide a link please
Thanks. Very helpful. But, the “name/ email” text and the “you have successful subscribed” text is super light I don’t see a way to bold or enlarge the font. Can I do it with CSS?
Thanks
You can use this classes to adjust that text:
#ds-transparent-optin input {font styles
}
#ds-transparent-optin.et_bloom h2.et_bloom_success_message.et_bloom_animate_message {
font styles
}
Hi! I have been trying to figure out why this isn’t working for me. I added the code below but the text is still white on a white background.
#ds-transparent-optin.et_bloom
h2.et_bloom_success_message.et_bloom_animate_message {
color: #000000;}
Can you help me with this?
Thanks!
You seem to have an extra space in your CSS, please try this:
#ds-transparent-optin.et_bloom h2.et_bloom_success_message.et_bloom_animate_message {
color: #000000;}
I copied and pasted the code and it still doesn’t work. :/
Do you have a link to the issue as what I am looking at is working
Thank you so much!!! Been struggling all day
Hi Michelle,
Thanks- I’m struggling to make it work for a widget layout as Divi does not give me the shortcode option before i can save the optin form. Any suggestions on how to make widgets’ background transparent?
You should just be able to use this Mark
.et_pb_widget {background: transparent;
}
Hi Michelle! This is very helpful, thank you! I’m attempting to put a form on a full width slider; however, it is not having the same effect (I’m assuming maybe because I put the “ds-transparent-optin” in the slider CSS vs. a text box CSS?) Is there a way to do this or am I missing something? Thank you!
I would really need a link to check this but the quickest way is to create it as per the tutorial, then give the section a negative top margin so it pulls up over the top of the slider
Hi, Michelle
Thank you for sharing. I’ve added the CSS code to the theme customizer, however, it doesn’t seem to be working. Can you kindly assist?
Thank you in advanced,
Sam Smith
Try adding to the page specific CSS box, this might be a caching issue
Thank you Michelle!
This is exactly what I needed now … how did you know ?
?
I have Ninja ESP
Hi Michelle, thanks for this tutorial. I am just new to wordpress. I am having trouble getting the background to be transparent on my form. I have followed your directions and it has fixed the header container (so I know it is partially working). I am wondering if it could be how I have the background image. It is the background image in the Section Module. Thanks for your help, Amy
Do you have a link please Amy?
Hello Michelle,
Thank you for this great post. I don’t seem to see a “Name” box / field in the settings. Am I missing something?
thanks.
It is in the ‘form setup’ section of the the page when designing your form
Only fresh ingredients, this tasted great. Great cook
Thanks Bernd