

Like our free content? Then you'll love our exclusive Club!
Divi Academy Membership gives you exclusive access to over 110 resources, including child themes, layouts, cheatsheets, tutorials, live training and member perks. And new content is added EVERY Monday!
Update: Due to changes with the way the Divi modules PHP files are structured, this method no longer works correctly. I will update this post when I get time but for the time being comments are closed.
Recipe #32 is the result of a question from Sara Gorsky in the Facebook groups. How to add social sharing to the Divi blog module.
When I saw this question I was immediately intrigued and my first thought was yes, Monarch can do this. And I am sure it can but after a bit of playing its not all that easy and in order to make this recipe as simple to implement and edit as possible, I have taken a different route.
I have chosen to use the free Social Share Buttons by Supsystic plugin for this Recipe but you can use any social share plugin you like, with one caveat; it must provide a shortcode to place the sharing icons as that is how we are going to implement the feature in the Divi blog module. Monarch currently only provides a shortcode for the social follow feature, not social share. But if that changes in future (which I hope it does as I love Monarch) then it should be a simple edit to swap to Monarch.
There are ways to edit a plugin and add in a shortcode but that is a little beyond my skill set at this point in time 
The best thing about this method is that once the shortcode is in place, all of the appearance editing is done via the social share plugin. I did try a few but the Social Share Buttons by Supsystic plugin proved to have a nice balance between simplicity and features as well as displaying nicely on the blog module after only editing a few settings.
So let’s get cooking!
Ingredients
The latest version of the Divi Theme from Elegant Themes.
An active child theme. We are going to be adding a new custom PHP file.
FTP or CPanel access to upload your new files.
The Social Share Buttons by Supsystic or a social sharing plugin that includes a shortcode for placement.
Cooking time
This should take you around 20 minutes.
Preparation
The first thing you will want to do is BACK UP before you begin, it’s not a good idea to start editing PHP without a back up
Next we need to install and activate our chosen social sharing plugin. As I said I am using Social Share Buttons by Supsystic but install and activate whichever plugin you feel comfortable with, you will just need to play around with the plugin settings to get the look you want.
I won’t go into detail on this as the plugin is pretty self explanatory and also you may chose to use a different one but below are the settings I am using in this plugin to achieve the look you see in the demo.


Now grab the shortcode from the plugin and save it somewhere as we are going to need that in a little while.

OK, that’s our prep done.
Method
Next we are going to set up a new library layout. Navigate to Divi > Divi Library and click Add New.
In the box that opens give your layout a name and select Section from the template type dropdown, then tick the Global checkbox and click Submit.

Now open up the section settings and on the Design tab set all the padding to zero then save & exit

Next, open up the row settings and set Make this row fullwidth to Yes, Use custom gutter width to Yes and set the Gutter width to 1.

Scroll down to the bottom and set all Custom margin and Custom padding to zero, then save & exit.

Lastly, add a single column and a text module to your row, and in the text editor of the module, paste in the shortcode from your social sharing plugin that we saved earlier. When done save & exit and be sure to update/publish your library layout.

So far so good. Now it’s time for our PHP.
Create a new folder inside your child theme called custom-modules, so your structure should look something like this:

Then inside the custom-modules folder, create a new file called cbm.php

Next, open up the unzipped folder for the latest version of Divi. As of writing, I am using version 3.0.60.
Navigate to Divi > Includes > Builder and open the main-modules.php file

Next we need to copy the code for the Divi Blog Module, this starts with the following code around line 14112:
class ET_Builder_Module_Blog extends ET_Builder_Module {
and ends with the following code around line 15260:
new ET_Builder_Module_Blog;
So in your cbm.php firstly add an opening php tag like this:
<?php
Then directly beneath that, paste in the module code from main-modules.php between lines 14112 and 15260 (approx) as mentioned just now.
Next, we need to edit the first and last lines slightly, so change this first line:
class ET_Builder_Module_Blog extends ET_Builder_Module {
to
class DS_Builder_Module_Blog extends ET_Builder_Module {
and the last line:
new ET_Builder_Module_Blog;
to
new DS_Builder_Module_Blog;
Now, around line 1048 in your cbm.php, look for this line of code:

Directly above that we need to paste in our shortcode. I can’t add this code here without breaking this page so click here to copy the code needed:
This will place our social share library layout directly above the post excerpt in the blog module.
Above excerpt:

If you want it below the post excerpt, you can instead paste it directly below echo ‘</div>’; around line 1082 in your cbm.php file.
Below excerpt:

You will need to change the number (48) to the ID of the library layout you created earlier. You can do this by opening up the layout in the library and looking at the number displayed after ‘post=’ in the URL in your browser.

Save and close your cbm.php file.
If this part has you a bit flustered, then you can just use the code in the toggles below. Open it up and paste the entire contents from the toggle into your empty cbm.php file. Choose the toggle based on whether you want the share icons above or below the excerpt.
Now we need to add a function to call our custom blog module. Open up functions.php in your child theme and paste in the following code then save and close the file.
function ds_social_share_blog() {
    if ( ! class_exists('ET_Builder_Module') ) {
        return;
    }
   get_template_part( 'custom-modules/cbm' );
    $cbm = new DS_Builder_Module_Blog();
    remove_shortcode( 'et_pb_blog' );
    add_shortcode( 'et_pb_blog', array($cbm, '_shortcode_callback') );
}
add_action( 'wp', 'ds_social_share_blog', 9999 );
What we are doing here is telling WordPress to replace the default Divi Blog Module with the custom one we just created in our cbm.php file.
Then save and close functions.php.
Finally, we need to upload our modified and new files. So in your FTP program or cPanel, upload your modified functions.php and your custom-modules folder containing your cbm.php file to your child theme folder.
If you are uploading via FTP, your structure should look like this (you may have more files in your child theme):
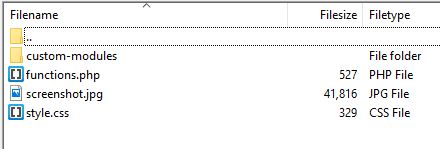
That’s it, now refresh your page and your Divi blog module should now show social sharing icons as you have set them in whichever plugin you are using.
You may need to play around with the plugin settings to get it looking exactly how you want. And if you want some extra spacing you can do this by adjusting the padding and margin in the Design tab of the Row settings for the section you created in the Divi Library.
Wow! I got through a whole recipe without a single bit of CSS. That’s got to be a first
If you found this helpful please leave a comment and subscribe to my newsletter for all my latest Divi related content. 
Michelle X






you just really helped me out, thanks so much for taking the time to explain this.
opened up a whole new world for things I would like to do now and in the future.
Happy New Year, Michelle!!!
Thank you for thi recipe, but I do not know which is the code that I sholud paste in the cbm.php file because the structure change.
In this case, I got the Eduardo comment and the code is of the blog.php file from:
class ET_Builder_Module_Blog extends ET_Builder_Module_Type_PostBased.
To:
new ET_Builder_Module_Blog;
This recipe is very utility and I think that it is important updating for the community.
Best regards,
Adri.
I will update when I get the time
Excellent recipe!
But some structure has changed with last updates: new path to files is
includes/builder/module
where blog.php is located and the new class is called
class ET_Builder_Module_Blog extends ET_Builder_Module_Type_PostBased.
Regards!
Thanks Eduardo!
still figuring out how to make it work though…
Hello, could you tell me if there is a way to hide social networks on some module? With CSS cod for example.
Yes, you can use display:none; to hide an element on a module, you will need if course the module class and the class of the element you want to hide
Thank you, it works perfectly. I wish you a good day.
That’s great
Thanks for this recipe. For some reason that I can’t find, my buttons are stacked in a vertical line. URL https://nedsa.co.za/blog/
I would appreciate any suggestion on how to rectify this.
Thanks!
I resolved this, it was the sizing in the Row Module Settings! Many thanks!
Glad you got it sorted
great recipe. Thanks alot
Most welcome